Receive a GCash payment
Learn how to receive a gcash payment from your customer.
The GCash payment method is when customers use their GCash account. To complete a GCash payment, your customer should select GCash as the payment method and complete the GCash verification step.
The GCash payment flow
At checkout, your customer can select GCash as the preferred payment method. Once your customer clicks the pay button, GCash will verify the transaction, and your customer must complete the verification step. GCash facilitates its verification step. PayRex facilitates the GCash transaction by rendering the payment page provided by GCash.
Low-code integration
PayRex offers a low-code solution that gives you more payment integration control.
- Checkout: This lets you redirect your customers to a PayRex-hosted checkout page.
- Elements: A UI component that you can embed into your website. When your customer is ready to complete a purchase, you create a PaymentIntent and configure how you want to display payment methods.
- Pages: Always-on payment pages that your customers can access any time to pay for your products and services. With Pages, you can receive payments right away without building a website.
Receiving a GCash payment
To receive a GCash payment, you must specify that you allow a GCash payment when creating a payment intent. The example below is for payment intent workflow.
- Node
- PHP
- Python
- Ruby
// Protect your PayRex Secret API key at all costs. One common approach
// to store it in an environment variable.
// Add your PayRex test secret API key.
const payrexSecretApiKey = '';

const payrex = require('payrex-node')(payrexSecretApiKey);

// Create a PaymentIntent with amount and currency
const paymentIntent = await payrex.paymentIntents.create({
  // Amount is in cents. The sample below is 100.00.
  amount: 10000,
  currency: 'PHP',
  payment_methods: [
    'gcash',
    // add more payment methods if this is your preference
  ],
});

const output = {
  clientSecret: paymentIntent.clientSecret,
}

console.log(JSON.stringify(output));
<?php

require_once '../vendor/autoload.php';

// Protect your PayRex Secret API key at all costs. One common approach
// to store it in an environment variable.
// Add your PayRex test secret API key.
$payrexSecretApiKey = '';
$payrex = new \Payrex\PayrexClient($payrexSecretApiKey);

// Create a PaymentIntent with amount and currency
$paymentIntent = $payrex->paymentIntents->create([
  // Amount is in cents. The sample below is 100.00.
  'amount' => 10000,
  'currency' => 'PHP',
  'payment_methods' => [
      'gcash',
    // add more payment methods if this is your preference
  ],
]);

$output = [
  'clientSecret' => $paymentIntent->client_secret,
];

echo json_encode($output);
from payrex import Client as PayrexClient

# Protect your PayRex Secret API key at all costs. One common approach
# to store it in an environment variable.
# Add your PayRex test secret API key.
payrex_secret_api_key = ''
payrex = PayrexClient(payrex_secret_api_key)

# Create a PaymentIntent with amount and currency
payment_intent = payrex.payment_intents.create(
    {
        # Amount is in cents. The sample below is 100.00.
        'amount': 10000,
        'currency': 'PHP',
        'payment_methods': [
            'gcash',
            # add more payment methods if this is your preference
        ]
    }
)

output = {
    'client_secret': payment_intent.client_secret
}

print(output)
require "payrex-ruby"

# Protect your PayRex Secret API key at all costs. One common approach
# to store it in an environment variable.
# Add your PayRex test secret API key.
payrex_secret_api_key = ""
payrex = Payrex::Client.new(payrex_secret_api_key)

# Create a PaymentIntent with amount and currency
payment_intent = payrex.payment_intents.create(
  # Amount is in cents. The sample below is 100.00.
  amount: 10000,
  currency: "PHP",
  payment_methods: [
    "gcash",
    // add more payment methods if this is your preference
  ]
)

output = {
  clientSecret: payment_intent.client_secret
}

puts output.to_json
Once you specify the gcash string, PayRex will handle the rest of your customer's payment flow.
Handling GCash Authentication
If you don't implement the necessary code changes, your customer's payment experience for gcash payment method in mobile will not proceed once the new authentication is deployed by GCash.
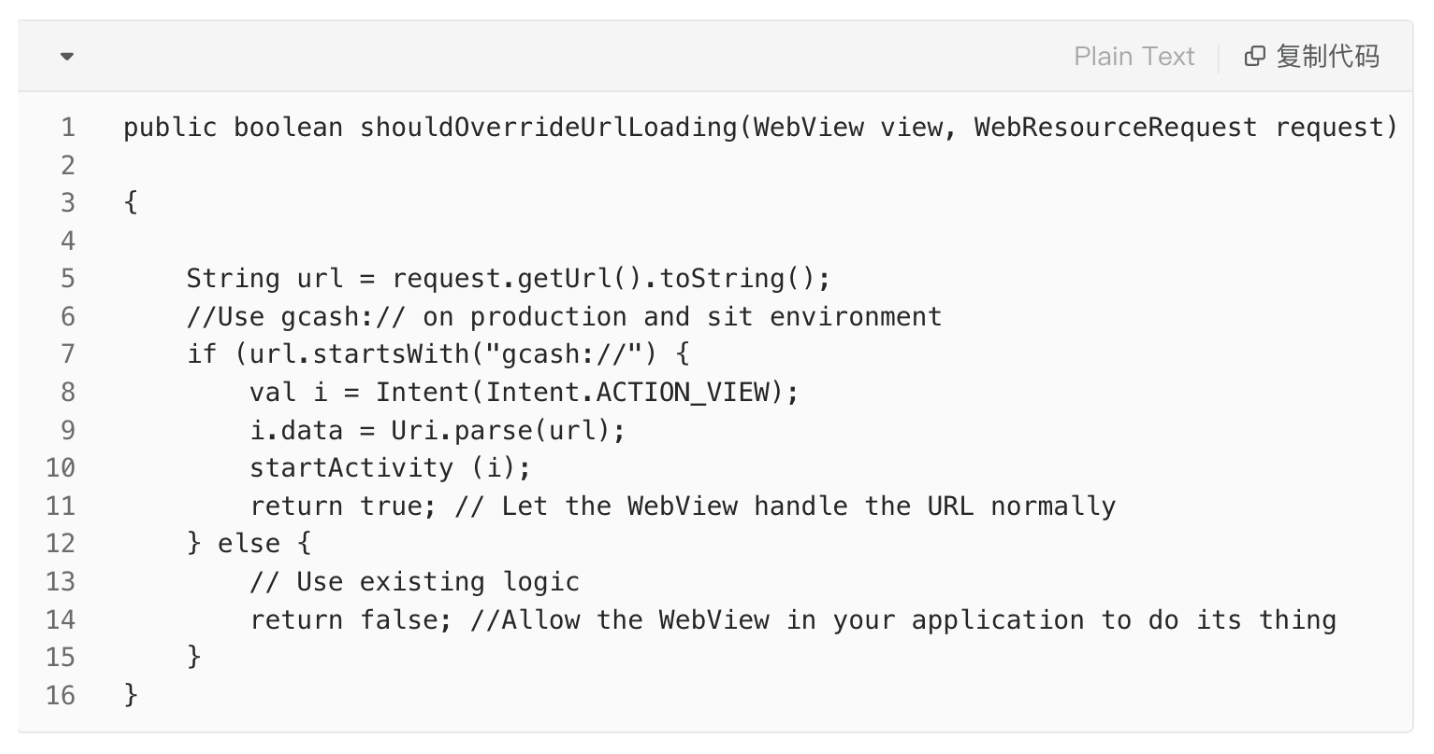
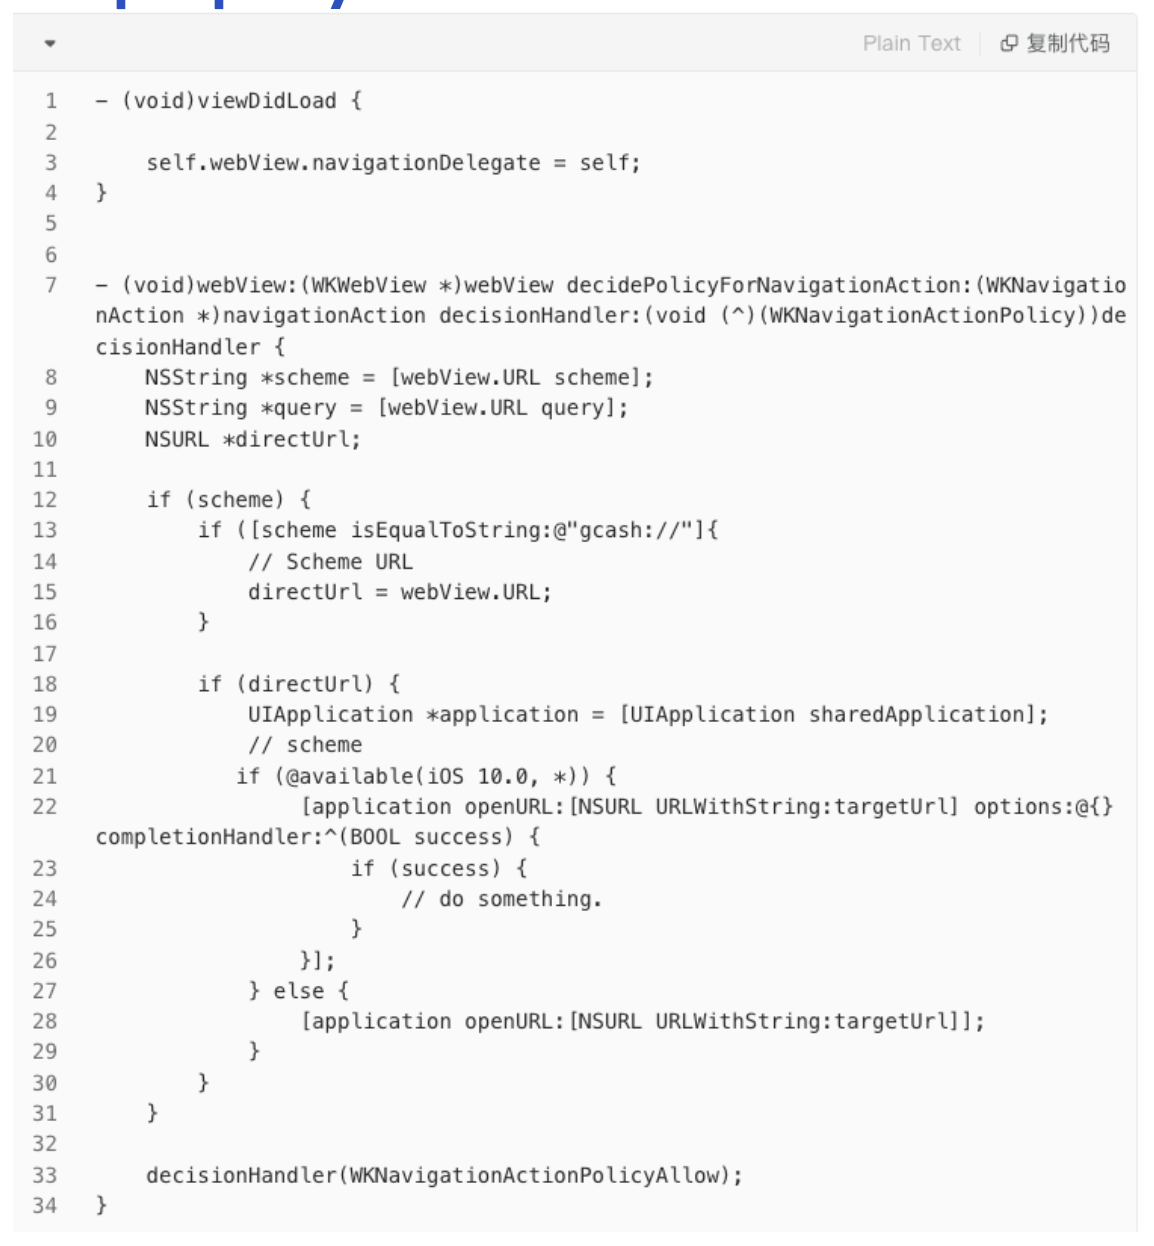
If you have integrated gcash payment method in a mobile app, you must apply some code changes in your app to handle the authentication of GCash. GCash dynamically adjusts their UI if your customer is paying through mobile or desktop.
For customers who pay through a desktop, GCash displays a QR code that your customer can scan using the GCash app.
For customers who pay through mobile (either via a native mobile app or mobile web), no QR code will be displayed. Your customer should click the "Open app" button provided by GCash. The "Open app" button contains a deep link, and your mobile app should handle the deep link behavior.
For Android

For IOS

For cross-platform mobile frameworks
If you are using cross-platform mobile frameworks such as Flutter or React Native, you must handle deep linking in your webview. You can use onShouldStartLoadWithRequest property for react native or navigationDelegate in Flutter. If the URL starts with gcash://, handle the redirection gracefully.