Checkout
Learn how to receive payments through PayRex Checkout by creating a PayRex-hosted Checkout Page and save time in your integration.
1. Set up the server-side
Install the server-side SDK and initialize with your secret API key
Install the appropriate SDK depending on your programming language and import it. If we don't support yet the programming language you're using, you may skip this step and use your preferred REST client.
- Node via npm
- PHP via composer
- Python via pip
- Ruby via gem
npm install payrex-node
composer install payrex/payrex-php
pip install payrex-python
gem install payrex-ruby
- Node
- PHP
- Python
- Ruby
// Protect your PayRex Secret API key at all costs. One common approach
// to store it in an environment variable.
// Add your PayRex test secret API key.
const payrexSecretApiKey = '';

const payrex = require('payrex-node')(payrexSecretApiKey);

// Create a CheckoutSession
const checkoutSession = await payrex.checkoutSessions.create({
  currency: 'PHP',
  // URL where your customer will be redirected after a successful payment.
  success_url: 'https://your-website.com/some-url',
  // URL where your customer will be redirected if they decide to not proceed with a payment
  cancel_url: 'https://your-website.com/some-url',
  payment_methods: ['gcash', 'card', 'maya', 'qrph'],
  line_items: [{
    name: 'Item 1',
    // Amount is in cents. The sample below is 100.00.
    amount: 10000,
    quantity: 1,
    // optional
    image: 'Publicly accessible image URL'
  }]
});

const output = {
  url: checkoutSession.url,
}

console.log(JSON.stringify(output));
<?php

require_once '../vendor/autoload.php';

// Protect your PayRex Secret API key at all costs. One common approach
// to store it in an environment variable.
// Add your PayRex test secret API key.
$payrexSecretApiKey = '';
$payrex = new \Payrex\PayrexClient($payrexSecretApiKey);

// Create a CheckoutSession
$checkoutSession = $payrex->checkoutSessions->create([
  currency =>  'PHP',
  // URL where your customer will be redirected after a successful payment.
  success_url => 'https://your-website.com/some-url',
  // URL where your customer will be redirected if they decide to not proceed with a payment
  cancel_url => 'https://your-website.com/some-url',
  payment_methods => ['gcash', 'card', 'maya', 'qrph'],
  line_items => [
    [
      name => 'Item 1',
      // Amount is in cents. The sample below is 100.00.
      amount => 10000,
      quantity => 1,
      // optional
      image => 'Publicly accessible image URL'
    ]
  ]
]);

$output = [
  'url' => $checkoutSession->url,
];

echo json_encode($output);
from payrex import Client as PayrexClient

# Protect your PayRex Secret API key at all costs. One common approach
# to store it in an environment variable.
# Add your PayRex test secret API key.
payrex_secret_api_key = ''
payrex = PayrexClient(payrex_secret_api_key)

# Create a CheckoutSession
checkout_session = payrex.checkout_sessions.create(
    {
        'currency': 'PHP',
        # URL where your customer will be redirected after a successful payment.
        'success_url': 'https://your-website.com/some-url',
        # URL where your customer will be redirected if they decide to not proceed with a payment
        'cancel_url': 'https://your-website.com/some-url',
        'payment_methods': ['gcash', 'card', 'maya', 'qrph'],
        'line_items': [{
          'name': 'Item 1',
          # Amount is in cents. The sample below is 100.00.
          'amount': 10000,
          'quantity': 1,
          # optional
          'image': 'Publicly accessible image URL'
        }]
    }
)

output = {
    'url': checkout_session.url
}

print(output)
require "payrex-ruby"

# Protect your PayRex Secret API key at all costs. One common approach
# to store it in an environment variable.
# Add your PayRex test secret API key.
payrex_secret_api_key = ""
payrex = Payrex::Client.new(payrex_secret_api_key)

# Create a CheckoutSession
checkout_session = payrex.checkout_sessions.create({
  currency: 'PHP',
  // URL where your customer will be redirected after a successful payment.
  success_url: 'http://google.com',
  // URL where your customer will be redirected if they decide to not proceed with a payment
  cancel_url: 'http://google.com',
  payment_methods: ['gcash', 'card', 'maya', 'qrph'],
  line_items: [{
    name: 'Item 1',
    // Amount is in cents. The sample below is 100.00.
    amount: 10000,
    quantity: 1,
    // optional
    image: 'Publicly accessible image URL'
  }]
})

output = {
  url: checkout_session.url
}

puts output.to_json
Create a checkout session
Create a CheckoutSession from the server side. A CheckoutSession resource represents a one-time use PayRex-hosted checkout page and will expire at a certain period. Return the CheckoutSession's url attribute so that you can redirect your customer to this URL.
After initializing the SDK with your secret API key, you must create a CheckoutSession. Once a CheckoutSession is created, return the CheckoutSession's url attribute in the response. The CheckoutSession's url will be used on the client side, which is the next step of the integration process. Some notable attributes you will normally specify when creating a CheckoutSession:
| Attribute | Description |
|---|---|
| line_items | The line_items attribute is the list of items that your customer will buy. For example, the line_items for an e-commerce store are the list of products they will buy from your e-commerce store. If you prefer not to list all the items they bought, you can add just a single line_item with generic line_item name. The line_items attribute will compute the final amount that your customer will pay. The formula for the final amount is the sum of line_items.quantity * line_items.amount which is automatically computed by the Checkout Session. |
| success_url | You must create a page where the customer will be redirected once they successfully paid a CheckoutSession. The CheckoutSession will handle the redirection for you. |
| cancel_url | You must create a page where the customer will be redirected once they decided that they don't want to pay and go back to your website. The CheckoutSession will handle the redirection for you. |
| payment_methods | The list of payment methods allowed for the CheckoutSession. This is the same payment_methods attribute from the PaymentIntent resource. If you did not indicate the list of payment methods, the default payment methods of your PayRex account will be used |
To learn more about the other possible attributes for checkout sessions, you can check the API reference.
The CheckoutSession creates a PaymentIntent resource under the hood. If you are not familiar yet with PaymentIntents, you can refer to this guide.
- Node
- PHP
- Python
- Ruby
// Protect your PayRex Secret API key at all costs. One common approach
// to store it in an environment variable.
// Add your PayRex test secret API key.
const payrexSecretApiKey = '';

const payrex = require('payrex-node')(payrexSecretApiKey);

// Create a CheckoutSession
const checkoutSession = await payrex.checkoutSessions.create({
  currency: 'PHP',
  // URL where your customer will be redirected after a successful payment.
  success_url: 'https://your-website.com/some-url',
  // URL where your customer will be redirected if they decide to not proceed with a payment
  cancel_url: 'https://your-website.com/some-url',
  payment_methods: ['gcash', 'card', 'maya', 'qrph'],
  line_items: [{
    name: 'Item 1',
    // Amount is in cents. The sample below is 100.00.
    amount: 10000,
    quantity: 1,
    // optional
    image: 'Publicly accessible image URL'
  }]
});

const output = {
  url: checkoutSession.url,
}

console.log(JSON.stringify(output));
<?php

require_once '../vendor/autoload.php';

// Protect your PayRex Secret API key at all costs. One common approach
// to store it in an environment variable.
// Add your PayRex test secret API key.
$payrexSecretApiKey = '';
$payrex = new \Payrex\PayrexClient($payrexSecretApiKey);

// Create a CheckoutSession
$checkoutSession = $payrex->checkoutSessions->create([
  currency =>  'PHP',
  // URL where your customer will be redirected after a successful payment.
  success_url => 'https://your-website.com/some-url',
  // URL where your customer will be redirected if they decide to not proceed with a payment
  cancel_url => 'https://your-website.com/some-url',
  payment_methods => ['gcash', 'card', 'maya', 'qrph'],
  line_items => [
    [
      name => 'Item 1',
      // Amount is in cents. The sample below is 100.00.
      amount => 10000,
      quantity => 1,
      // optional
      image => 'Publicly accessible image URL'
    ]
  ]
]);

$output = [
  'url' => $checkoutSession->url,
];

echo json_encode($output);
from payrex import Client as PayrexClient

# Protect your PayRex Secret API key at all costs. One common approach
# to store it in an environment variable.
# Add your PayRex test secret API key.
payrex_secret_api_key = ''
payrex = PayrexClient(payrex_secret_api_key)

# Create a CheckoutSession
checkout_session = payrex.checkout_sessions.create(
    {
        'currency': 'PHP',
        # URL where your customer will be redirected after a successful payment.
        'success_url': 'https://your-website.com/some-url',
        # URL where your customer will be redirected if they decide to not proceed with a payment
        'cancel_url': 'https://your-website.com/some-url',
        'payment_methods': ['gcash', 'card', 'maya', 'qrph'],
        'line_items': [{
          'name': 'Item 1',
          # Amount is in cents. The sample below is 100.00.
          'amount': 10000,
          'quantity': 1,
          # optional
          'image': 'Publicly accessible image URL'
        }]
    }
)

output = {
    'url': checkout_session.url
}

print(output)
require "payrex-ruby"

# Protect your PayRex Secret API key at all costs. One common approach
# to store it in an environment variable.
# Add your PayRex test secret API key.
payrex_secret_api_key = ""
payrex = Payrex::Client.new(payrex_secret_api_key)

# Create a CheckoutSession
checkout_session = payrex.checkout_sessions.create({
  currency: 'PHP',
  // URL where your customer will be redirected after a successful payment.
  success_url: 'http://google.com',
  // URL where your customer will be redirected if they decide to not proceed with a payment
  cancel_url: 'http://google.com',
  payment_methods: ['gcash', 'card', 'maya', 'qrph'],
  line_items: [{
    name: 'Item 1',
    // Amount is in cents. The sample below is 100.00.
    amount: 10000,
    quantity: 1,
    // optional
    image: 'Publicly accessible image URL'
  }]
})

output = {
  url: checkout_session.url
}

puts output.to_json
[OPTIONAL] Require or make billing information fields optional
By default, PayRex will show all the billing information fields in our payment form. The billing information provided by your customer will be used to complete the payment and increase the accuracy of assessing the transaction risk. PayRex can allow you to either always show a certain billing information field or let PayRex handle it for you.
On top of your code to create a checkout session, you can pass another attribute called billing_details_collection to manage the behavior of the billing information fields rendered in the payment form.
| Billing information field setting | Description |
|---|---|
| auto | Set this configuration if you will let PayRex handle if a field a required field or not. |
| always | Set this configuration if you want to always show the field to your customer. |
If your chargeback rate is increasing, there's a chance that our Fraud & Risk team will require you to show all billing information fields to manage your chargeback rate.
- Node
- PHP
- Python
- Ruby
// Protect your PayRex Secret API key at all costs. One common approach
// to store it in an environment variable.
// Add your PayRex test secret API key.
const payrexSecretApiKey = '';

const payrex = require('payrex-node')(payrexSecretApiKey);

// Create a CheckoutSession
const checkoutSession = await payrex.checkoutSessions.create({
  // redacted code
  billing_details_collection: 'auto'
});

const output = {
  url: checkoutSession.url,
}

console.log(JSON.stringify(output));
<?php

require_once '../vendor/autoload.php';

// Protect your PayRex Secret API key at all costs. One common approach
// to store it in an environment variable.
// Add your PayRex test secret API key.
$payrexSecretApiKey = '';
$payrex = new \Payrex\PayrexClient($payrexSecretApiKey);

// Create a CheckoutSession
$checkoutSession = $payrex->checkoutSessions->create([
  // redacted code
  billing_details_collection => 'auto'
]);

$output = [
  'url' => $checkoutSession->url,
];

echo json_encode($output);
from payrex import Client as PayrexClient

# Protect your PayRex Secret API key at all costs. One common approach
# to store it in an environment variable.
# Add your PayRex test secret API key.
payrex_secret_api_key = ''
payrex = PayrexClient(payrex_secret_api_key)

# Create a CheckoutSession
checkout_session = payrex.checkout_sessions.create(
    {
      # redacted code
      'billing_details_collection': 'auto'
    }
)

output = {
    'url': checkout_session.url
}

print(output)
require "payrex-ruby"

# Protect your PayRex Secret API key at all costs. One common approach
# to store it in an environment variable.
# Add your PayRex test secret API key.
payrex_secret_api_key = ""
payrex = Payrex::Client.new(payrex_secret_api_key)

# Create a CheckoutSession
checkout_session = payrex.checkout_sessions.create({
  # redacted code
  billing_details_collection: 'auto'
})

output = {
  url: checkout_session.url
}

puts output.to_json
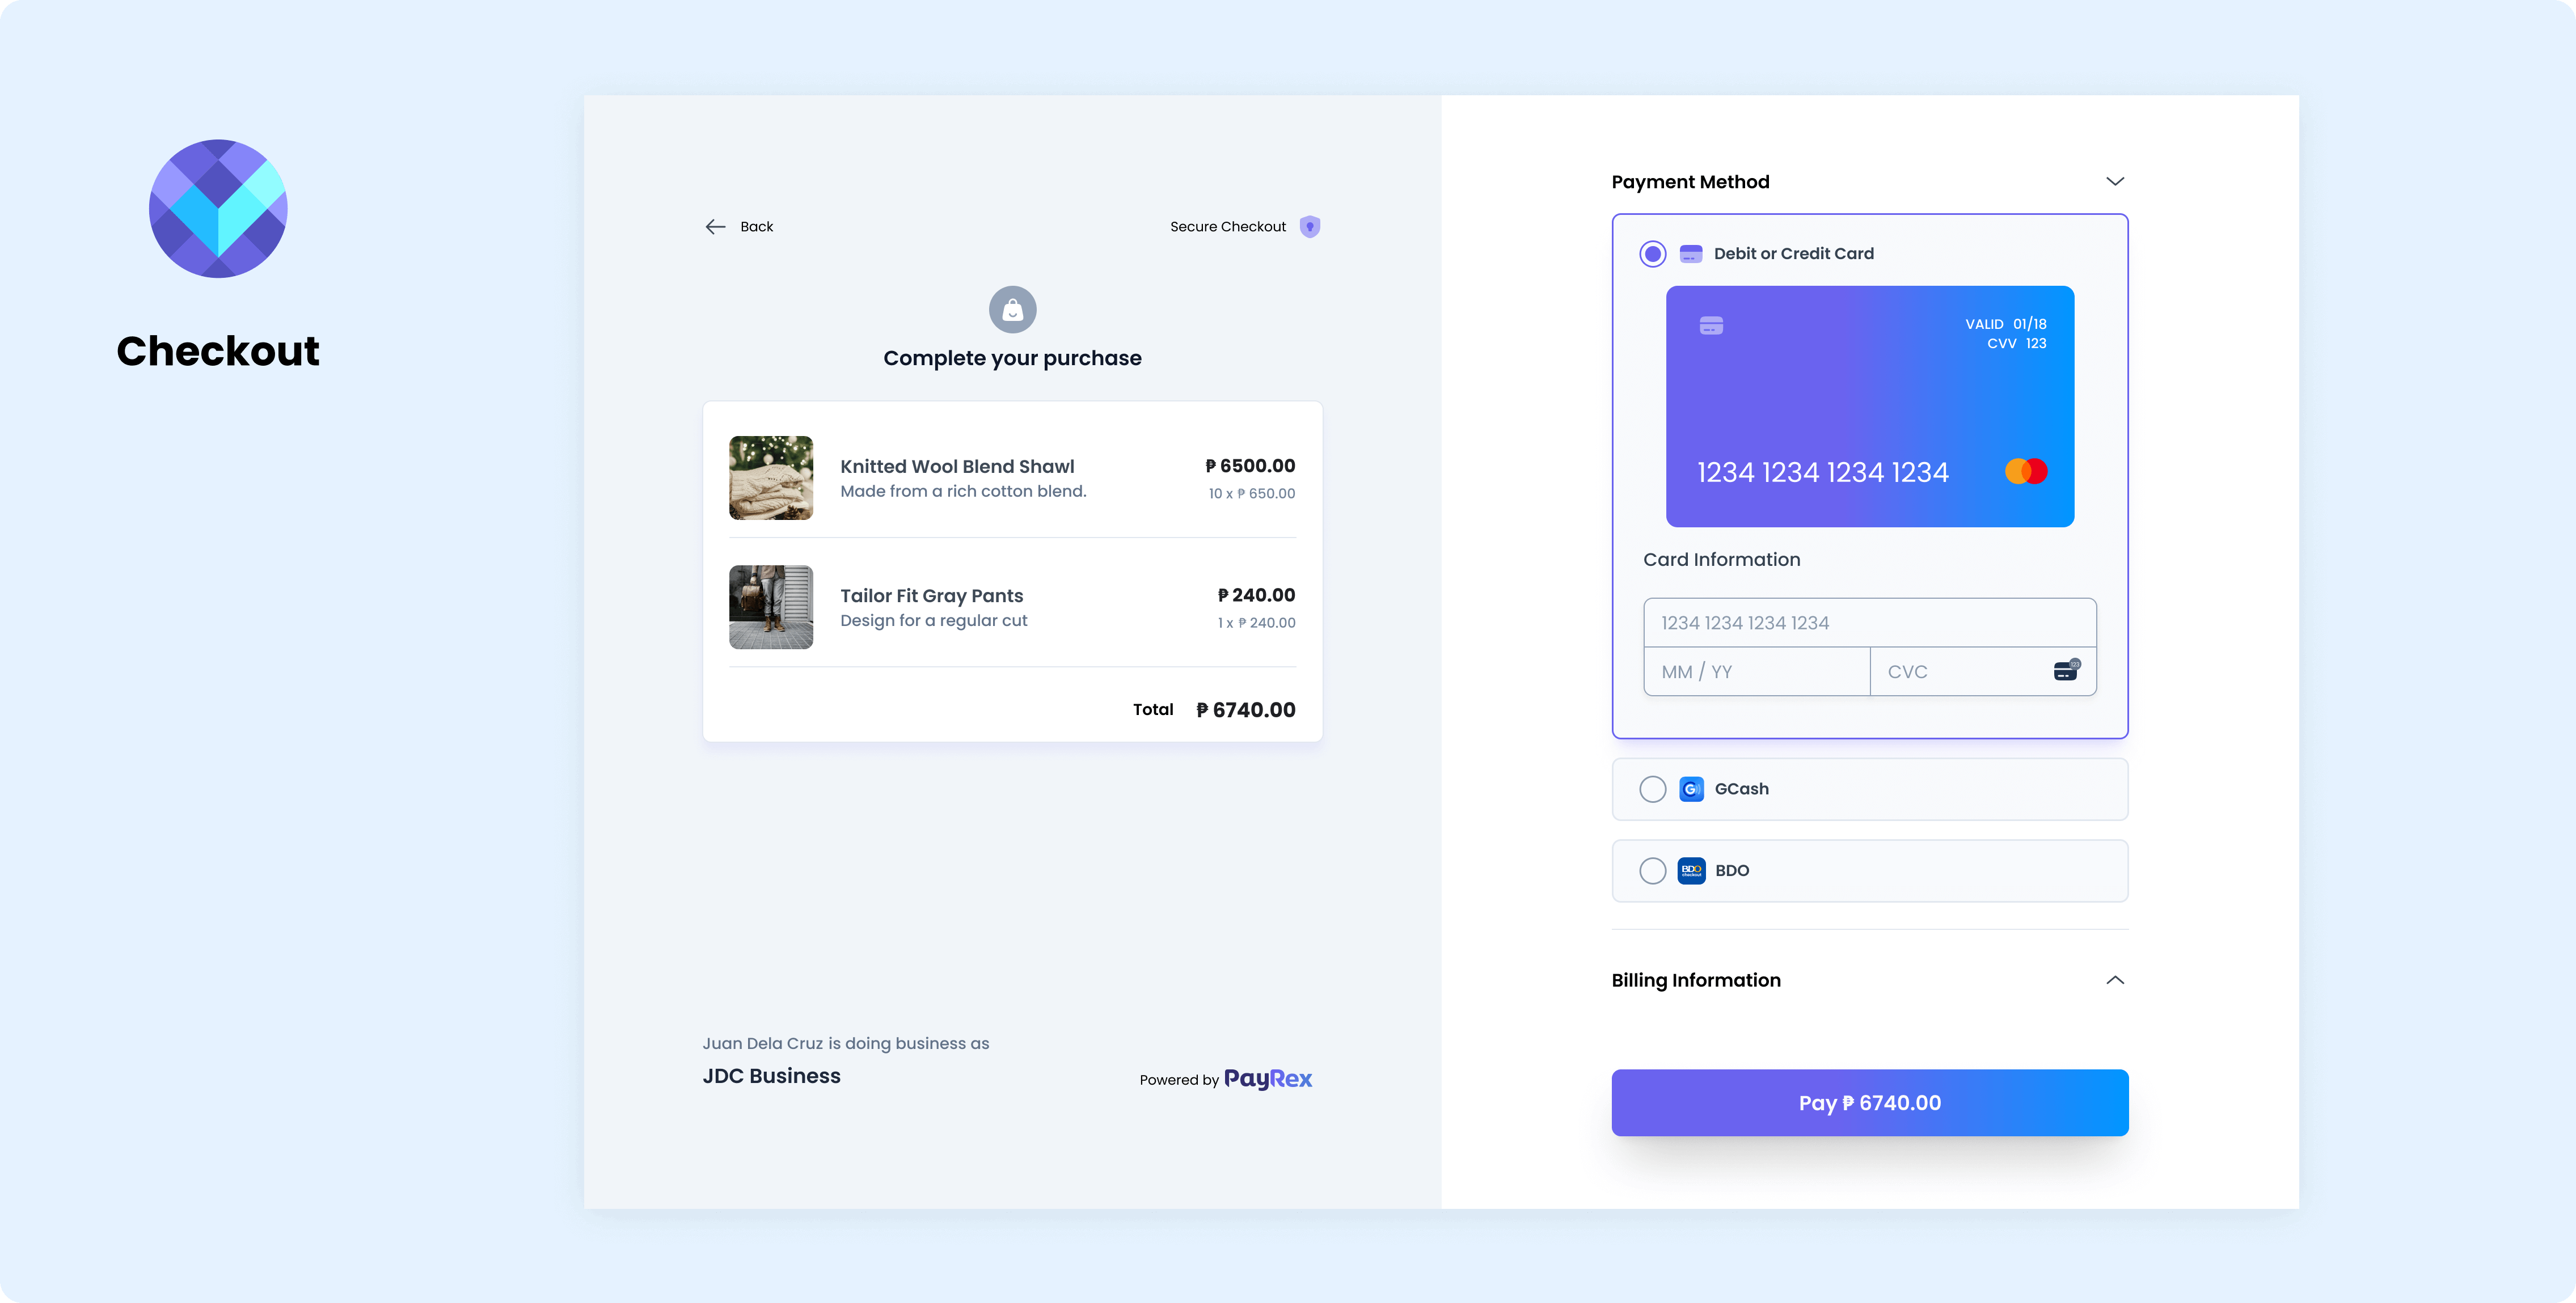
2. Redirect the customer to the CheckoutSession url and let the customer complete the payment
After creating the CheckoutSession, redirect your customer to the URL for the Checkout page returned in the response from step 1. The URL of the CheckoutSession is referenced via url attribute.
Once the customer completed the payment, they will be redirected to your nominated success_url.
A CheckoutSession expires at some point. If the CheckoutSession has transitioned to expired, you must create a new CheckoutSession if you want your customer to complete the payment.